As always download the newest version of the blueprint breakdown from here.
This next section focuses around LUN setup and configuration. LUNs are the targets of block level storage protocols. This includes both iSCSI and Fibre Channel. When discussing LUNs in terms of Data ONTAP, they are really nothing more than a file that sits within a volume or within a qtree within a volume. However this file is accessed completely different than say an exported NFS volume. It is mapped to an igroup, which grants access to the LUN to another device, and the file behaves just like a disk drive. This is a pretty dumbed down definition of a LUN. I’m not discussing multipathing which is something that you absolutely need. More in-depth discussion will occur in the SAN section. For now, this is all basic configurations of LUNs on a NetApp storage device. NetApp recommends a 1:1 relationship between volumes and LUNs.
We’re going to perform the following labs in both the CLI and System Manager where the capabilities to do in both exist.
- Configure igroup for LUN connectivity/Add LUN to igroup
- Create/Expand/Delete/Rename/Move LUN
- Discuss Geometry issues with LUNs
Before we start any configuration, to perform the majority of these labs we’ll need to have an initiator and a target so we can see how a LUN shows up. We’re going to do this with iSCSI since the simulator doesn’t have Fibre Channel capabilities and we don’t have an FC network either. We’re going to use the following parts of the lab:
- Student VM – added an extra NIC on the 192.168.175.x/24 network for iSCSI traffic. (Typically iSCSI traffic would be on a separate VLAN all together, but this still does what we need it to do and also provides the necessary NIC that Windows Server 2008 R2 needs to run the MS iSCSI initiator over.) I gave the second NIC the IP address of 192.168.175.20 so that we can use that as the initiator IP address on the igroup configuration.
- CentOS VM – added an extra NIC on the 192.168.175.x/24 network for iSCSI traffic. I gave the second NIC the IP address of 192.168.175.21 so that we can use that as the initiator IP address on the igroup configuration.
- ONTAP1
To setup the iSCSI initiator within Windows Server 2008 R2, you need to perform the following steps:
Login to the VM and in the search bar type ‘iscsi’. You’ll see two options. You can select either.
 You’ll be shown a warning message about the iSCSI service not running. Click Yes to start the service and bring up the initiator configuration menu.
 To continue we’ll need a bit of information from the NetApp, i.e. the target IQN of the device. First confirm that the iSCSI service is running and then display the node name. This is the IQN we need to verify we are connected to the correct device.
iscsi status
Iscsi nodename
 Now that we have ensured that iscsi is running and we know the target name, we can finish the Windows configuration. In the iSCSI configuration menu, on the Target Tab we can put in the IP address of the ONTAP1 filer, 192.168.175.10. Press Quick Connect and we should be connected. Verify the IQN is correct. Click Done once verified.
 Since we haven’t configured any disks yet, we won’t see anything show up in the Devices tab. We will however, need the IQN from the initiator to configure the igroup on the NetApp. This is under the Configuration tab under Initiator Name. Typically this name is as combination of the initiator’s computer name and a randomly generated alphanumeric combination at the end. For simplicity I shortened it to just ‘iqn.1991-05.com.microsoft:student’. This makes configuration a bit easier. Make sure you reboot the device after changing the name. In a production environment, this value has to be unique. Typically there’s no reason it shouldn’t be as each machine should be named differently, but it could happen. So be careful changing the initiator’s name.
 Now we’re going to configure the iSCSI initiator for CentOS. You can use this guide to help with the configuration. Here’s exactly what I did from the terminal window in the CentOS VM:
 # su root
# yum install iscsi-initiator-utils
# /etc/init.d/iscsi start
# ping 192.168.175.10
# iscsidm –m discovery –t sendtargets –p 192.168.175.10
Starting iscsid:                                                                   [   OK   ]
192.168.175.10:3260,1000 iqn.1992-08.com.netapp:sn.4061490311
# cat /etc/iscsi/initatorname.iscsi
InitiatorName=iqn.1994-05.com.redhat:ebc90b7847e
Yahtzee! It works and is connected. Now that we have both initiators started and connected, we can go ahead with creating the igroup on the NetApp and the LUNs that we will associate to each device.
Configure igroup for LUN connectivity – CLI
This is pretty easy to do. We’re going to create two igroups, one for our windows machine and one for our Linux machine then verify that the group is created.
igroup create –i –t windows iqn.1995-05.com.microsoft:student
igroup create –i –t linux iqn.1994-05.com.redhat:ebc90b7847e
 Add LUN to igroup – CLI
Confirm the names of the LUNs we’re going to add to the igroup
lun show
 We have two specific LUNs each configured with the appropriate OS type and 3GB in size. We also can see that they differ slightly from the other two LUNs in the display. The top two do not show as ‘mapped’. This means they are not added to any igroup which we are about to do and you’ll see the change. Now we can add them to the igroup then display the mappings to ensure they are correctly configured.
lun map /vol/STUDENT/STUDENT_lun
lun map /vol/CENTOS/CENTOS_lun
lun show -m
 Now we can rescan for changes on the Windows and CentOS machines to see the volumes show up for us. Format them and use them.
Open the iSCSI Initiator Properties and on the Targets tab click on Devices. This should show us our new LUN attached to the system.
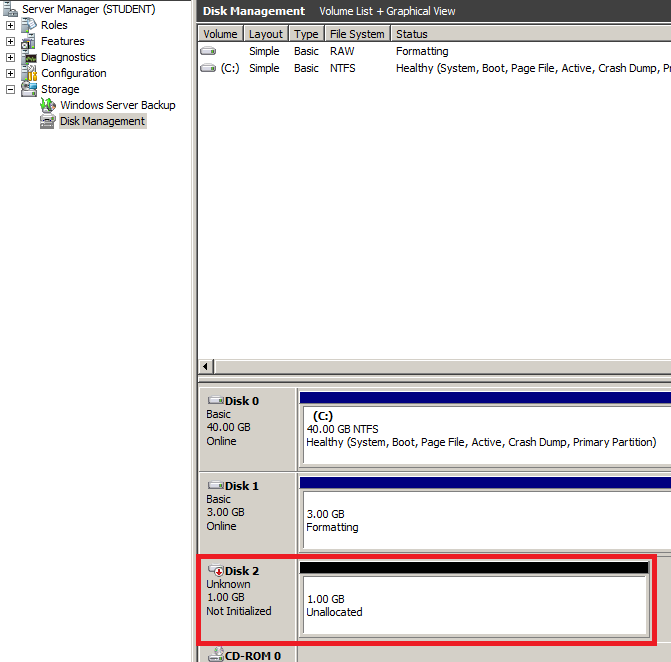
 Now we just need to open up Disk Management and Rescan if necessary to see the volume show up. Format it and we’re all set.
 We can also verify that we’re going across the second NIC that we put on the VM from the CLI.
iscsi session show –v
 All looks good. Now we can do the Linux machine. This is pretty simple, you just need to restart the iSCSI daemon and it will send a discovery and pull in the LUN.
su root
/etc/init.d/iscsi restart
fdisk –l
 That’s it. You can see that now the 3GB volume is showing up in fdisk.
Configure igroup for LUN connectivity – System Manager
I’m not going to go through how to do it with Linux as it’s no different than doing it for Windows using System Manager.
Log into System Manager and the Data ONTAP instance. Expand the device, click on Storage and click on LUNs. In the LUNs section, there is an Initiator Groups tab.
 Click on Create, name the group STUDENT, select the operating system Windows, and the type of iSCSI.
 Click on the Initiators tab and then put in the IQN of the initiator for the STUDENT machine and click Create.
 Add LUN to igroup – System Manager
Login to System Manager and the Data ONTAP instance. Expand the device, click on Storage and click on LUNs. In the LUNs section, there is a LUN Management tab.
 Click on the STUDENT_lun LUN and click on Edit. There is an Initiators groups tab with Edit LUN. This will bring up all the initiators of the type that matches the operating system type of the igroup. In other words, if the LUN is a Windows LUN, and the igroup is Windows, you’ll see the Windows initiator groups. Check the Map box for STUDENT and click Save and Close.
From here you can create a new igroup if you want, show all the groups and even assign a custom LUN ID for the LUN. If you don’t select a LUN ID, ONTAP will do it for you.

That takes care of that.
Create LUN – CLI
Creating a LUN from the CLI can be done two different ways. You can use ‘lun create’ or ‘lun setup’. The ‘lun setup’ command takes you step by step through the process. Alternatively, then ‘lun create’ process expects that you know the steps.
We’ll create a new LUN, 1GB in size, Windows 2008 capable, residing in /vol/test_vol3, space-reserved, attached to igroup STUDENT, with a LUN ID of 1, and named ‘setuplun’
The ‘lun setup’ process:
 Verify:
Open up the STUDENT machine and rescan for the 1GB LUN. That’s it.
 Expand LUN – CLI
Expanding a LUN is a simple process. You first need to ensure that the encapsulating volume has the appropriate room for the LUN to expand into. After that, it’s a simple command and rescan on the host to see the new size. The command isn’t much different than the ‘vol resize’ command.
df –m /vol/test_vol3
lun resize /vol/test_vol3/setuplun +1g
 Now that we have expanded the LUN, we’ll rescan the STUDENT machine to see the change in drive size.
 Delete LUN – CLI
Deleting a LUN is very simple. You have to un-map it first before you can destroy it. Similar to taking a volume offline before being able to destroy it.
lun show –m
lun unmap /vol/test_vol3/setuplun STUDENT
lun destroy /vol/test_vol3/setuplun
lun show
 Verify the LUN is gone from the STUDENT machine by running a rescan.
 Rename LUN – CLI
Renaming a LUN involves using a non-intuitive way in the ‘lun move’ command. We’re going to use that command and ‘move’ the LUN to the same volume in which it’s stored. This effectively renames the LUN. We’ll change the name to ‘setuplunrn’.
lun show –m /vol/test_vol3/setuplun
lun move /vol/test_vol3/setuplun /vol/test_vol3/setuplunrn
lun show /vol/test_vol3/setuplunrn
lun show -m
 Since we can’t see LUN names in Windows, there’s no reason to rescan the STUDENT host.
Move LUN – CLI
Like I stated above, the move command is used for two different types of tasks. LUN moves can only occur within the same volume. However you can move them within qtrees within the same volume. If you want to move a LUN from volume to volume, you’ll need to do something like ‘lun clone’ and the split it out and remove the old LUN after you’ve verified it working properly. That’s a deeper discussion further along. We created a couple new qtrees to move the LUN to, qtree1 and qtree2. I already moved the LUN into qtree1.
lun show –m
lun move /vol/test_vol3/qtree1/setuplun /vol/test_vol3/qtree2/setuplun
lun show –m
 The key thing to realize here is that we moved this LUN into a completely different qtree without disruption.
Create LUN – System Manager
Creating a LUN in System Manager is a pretty easy process. We’re going to use an existing volume, test_vol3, to create a LUN in and map it to STUDENT. Start off by opening System Manager and navigating to Storage>LUNs
Click on Create and name the LUN ‘smlun’. Make it for Windows and thin provision it.
 Select the volume /vol/test_vol3 from the menu and Click OK
 Select the STUDENT initiator group for mapping the LUN to.
 Verify the settings are accurate and Click Next and Finish
Verify the LUN shows up
 Verify the LUN shows up on the STUDENT machine by rescanning for storage
 Expand LUN – System Manager
To expand a LUN start by navigating to Storage>LUNs and clicking on the LUN you want to expand and clicking Edit
 Change the value to 2GB and click Save and Close. Since we thin-provisioned you will see a couple of messages that discuss that we’ll need to rescan for the space to show up. Verify the amount of disk space changed to 2GB on the STUDENT machine by rescanning and checking the size.
 Delete LUN – System Manager
To delete a LUN start by navigating to Storage>LUNs and clicking on the LUN you want to delete and clicking Edit. Click on the Initiator Groups tab at the top and de-select the STUDENT map selection. Click on Save and Close when finished. You should always un-map a LUN before deleting it to ensure that nothing is connected to it.
 Offline the LUN by clicking on the Status button and selecting Offline
 Delete the LUN by clicking on the Delete button, checking the box to engage the Delete button, and clicking on Delete.
 Rename LUN – System Manager
To rename a LUN start by navigating to Storage>LUNs and clicking on the LUN you want to rename and clicking Edit
 Change the name by adding a ‘2’ to the end and clicking Save and Close. Verify the name changed
 Move LUN – System Manager
You cannot move a LUN from System Manager
Discuss Geometry issues with LUNs
LUNs are not able to be expanded more than the geometry will allow. Since not everyone remembers what the original size of a LUN was, especially if you find yourself expanding things all the time and have tons and tons of LUNs, you can find out how larger you can grow the LUN in question by going into the diagnostic area of Data ONTAP. Warning, going in here is not recommended outside a lab unless you know what you’re doing. You can really screw something up. You’ve been warned.
To access the diagnostic mode, you need to run the following:
priv set diag
lun geometry /vol/test_vol3/smlun
 From here you can see that the LUN can be grown up to a maximum size of 502GB in size. If you need to exceed that amount, you will have to create a new LUN and copy the data to it.
